1.3 IOC的概念和作用
现在我们是时候揭晓IOC的谜底了。
通过以上分析,我们创建对象的方式有两种:
第一种:
AccountDao dao = new AccountDaoImpl();
第二种:
AccountDao dao = (AccountDao) BeanFactory.getBean("accountDao");
这两种有什么不同?
第一种创建对象的方式是我们主动创建的,控制权在我们手里。但是程序的耦合性高
第二种创建对象的方式是交给工厂帮我们创建的,控制权交给工厂了。这样降低了程序的耦合性。
但是我们每次都 自己 通过工厂+配置的方式创建对象的过程过于繁琐,那我们看看Spring是如何帮我们做的。
1.3.1 基于XML的IOC环境搭建和入门
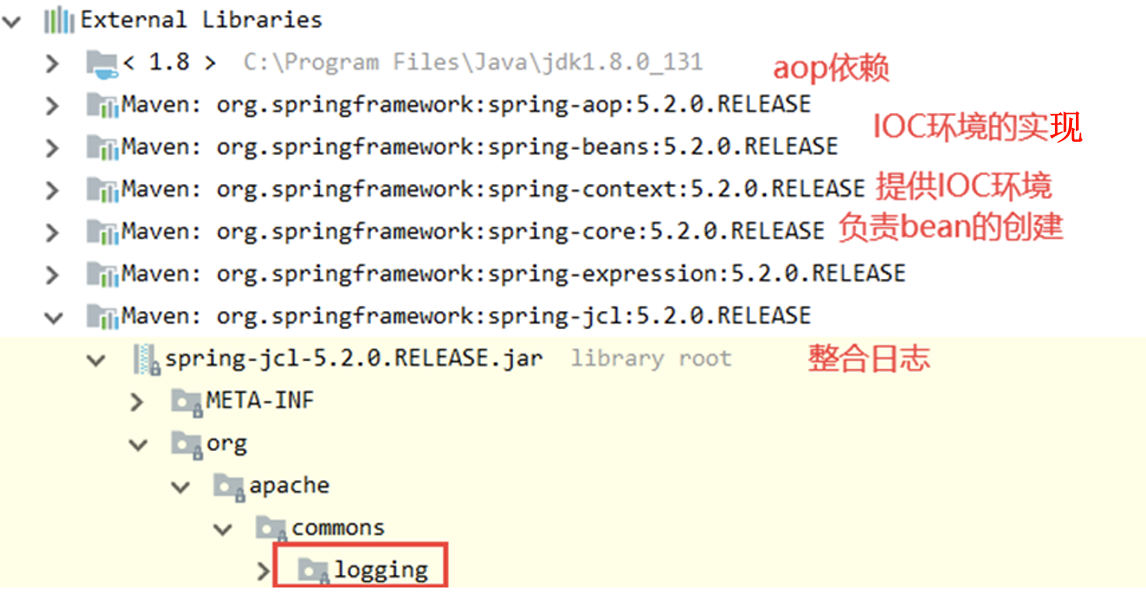
1.3.1.1 创建一个maven工程, 导入spring的依赖
<dependencies>
  <dependency>
    <groupId>org.springframework</groupId>
    <artifactId>spring-context</artifactId>
    <version>5.2.0.RELEASE</version>
  </dependency>
</dependencies>
| ##container## |
|---|
 |
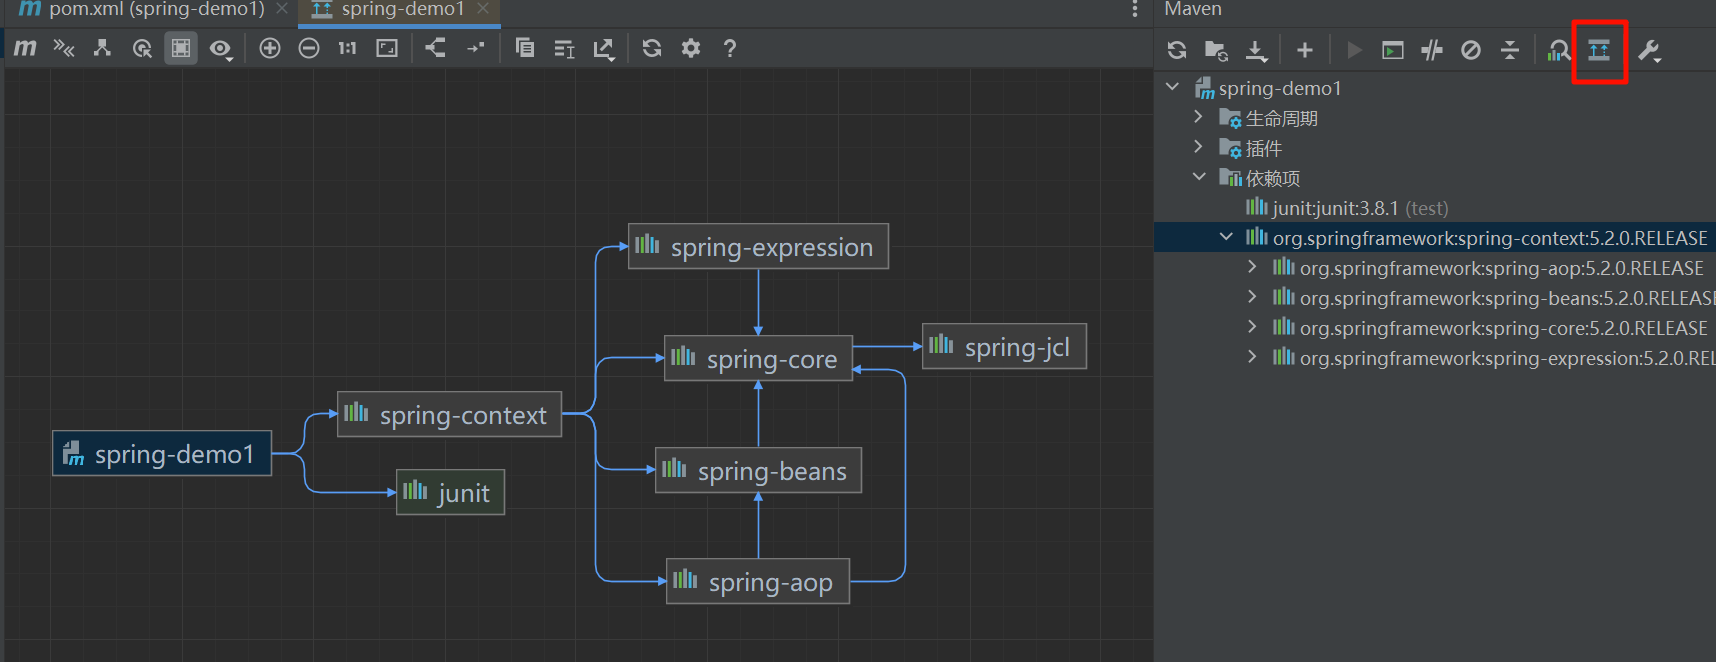
我们也可以查询这些依赖的对应关系:
| ##container## |
|---|
 |
1.3.1.2 创建接口和实现类
public interface AccountDao {
    public void addAccount();
}
public class AccountDaoImpl implements AccountDao {
    @Override
    public void addAccount() {
        System.out.println("[Dao]: 新增账户的方法实现了....");
    }
}
public interface AccountService {
    public void addAccount();
}
public class AccountServiceImpl implements AccountService {
    @Override
    public void addAccount() {
        System.out.println("[Service]: 新增账户的方法实现了....");
    }
}
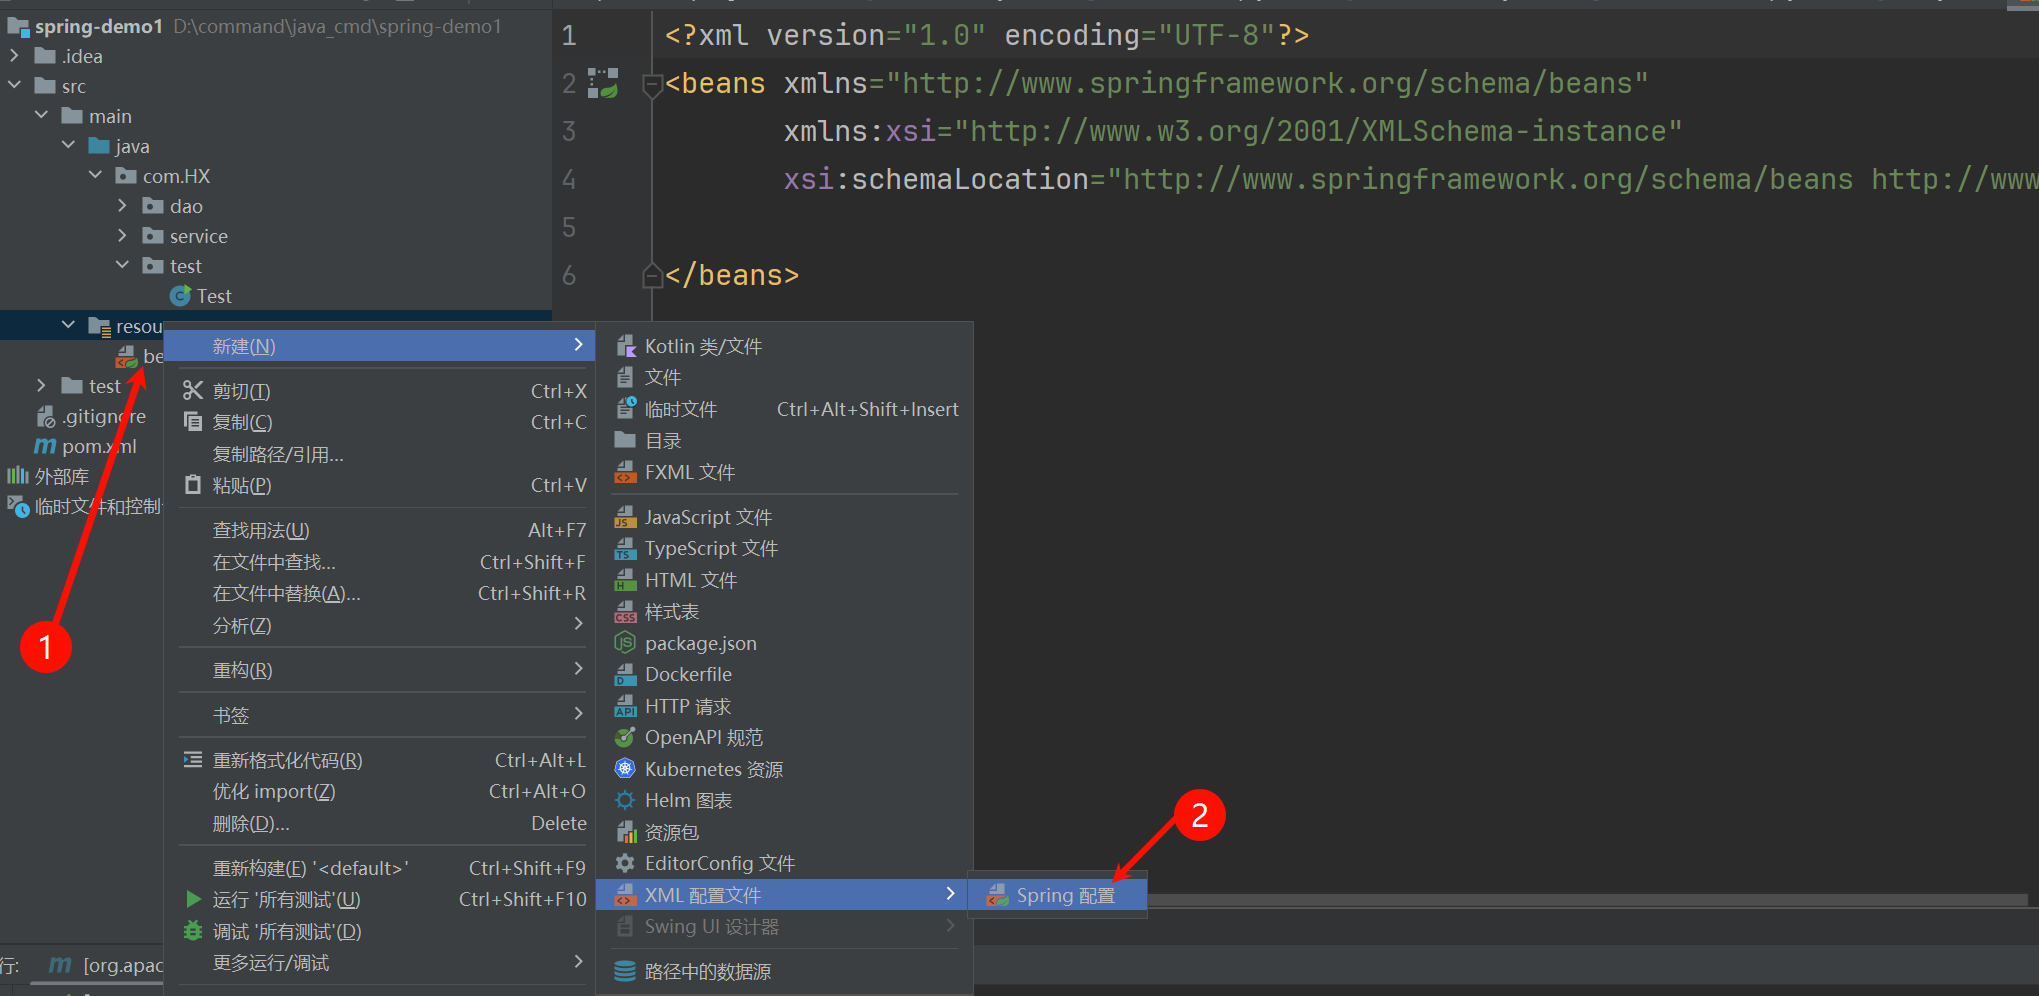
1.3.1.3 创建Spring的配置文件
| ##container## |
|---|
 |
<?xml version="1.0" encoding="UTF-8"?>
<beans xmlns="http://www.springframework.org/schema/beans"
       xmlns:xsi="http://www.w3.org/2001/XMLSchema-instance"
       xsi:schemaLocation="http://www.springframework.org/schema/beans http://www.springframework.org/schema/beans/spring-beans.xsd">

    <!-- 使用IOC容器管理bean -->
    <bean id="accountDao" class="com.HX.dao.impl.AccountDaoImpl"></bean>
    <bean id="accountService" class="com.HX.service.impl.AccountServiceImpl"></bean>
</beans>
id可以随意, 但必需唯一.class是对应类的全限定名.
测试一下:
public class Test {
    public static void main(String[] args) {
        ApplicationContext context = new ClassPathXmlApplicationContext("bean.xml");
        AccountService accountService = (AccountServiceImpl) context.getBean("accountService");
        AccountDao accountDao = (AccountDaoImpl) context.getBean("accountDao");
        accountService.addAccount();
        accountDao.addAccount();
    }
}
output:
[Service]: 新增账户的方法实现了....
[Dao]: 新增账户的方法实现了....
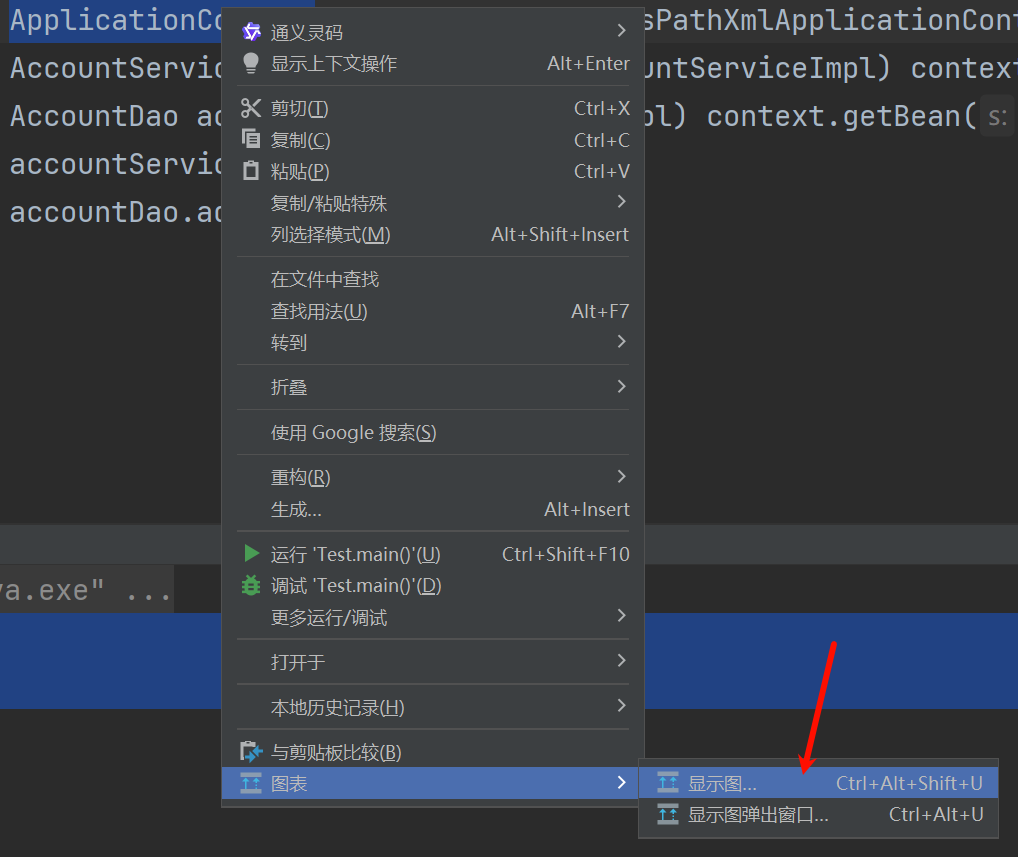
1.3.2 详解ApplicationContext
ApplicationContext是Spring给我们提供的核心容器。我们可以去查看它的依赖关系。
| ##container## |
|---|
 |
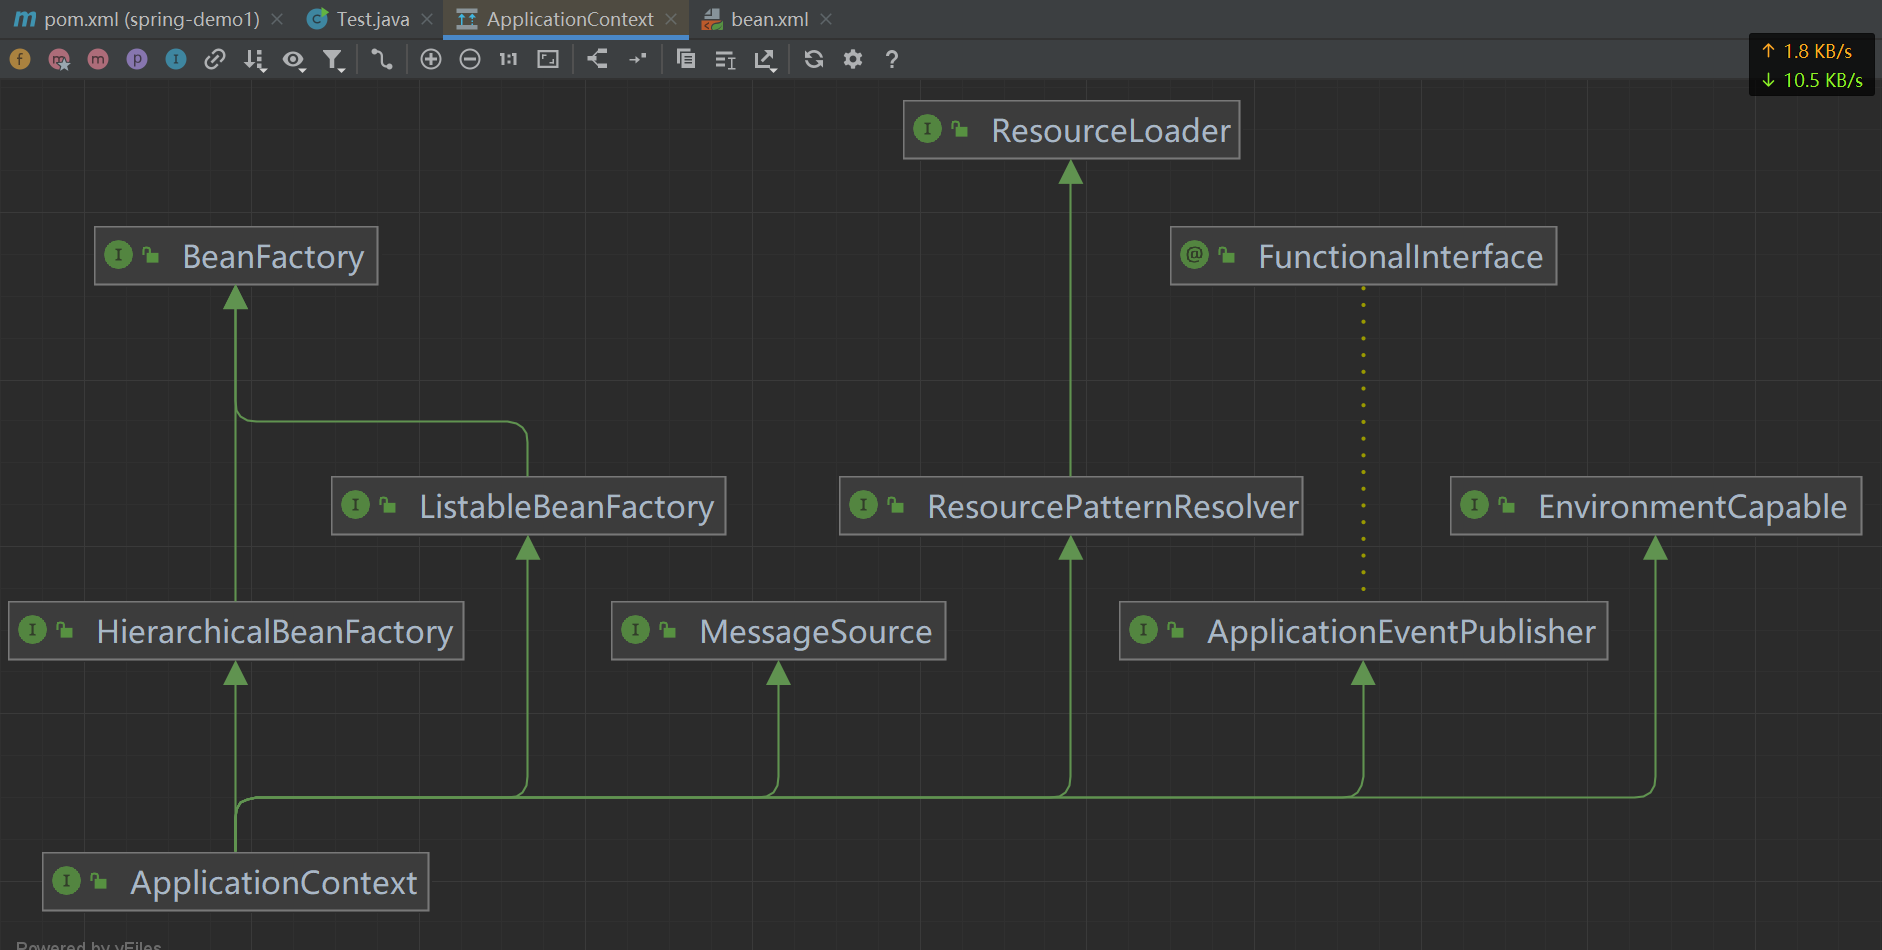 |
我们发现ApplicationContext继承了BeanFactory。BeanFactory才是顶级容器。
那么这两个核心的容器有什么区别呢?
- ApplicationContext
ApplicationContext在构建核心容器时,创建对象采取的策略是采用立即加载的方式。也就是说,只要一读取完配置文件马上就创建配置文件中配置的对象。
我们来证明一下:
先添加一下构造函数:
public class AccountDaoImpl implements AccountDao {
    AccountDaoImpl() {
        System.out.println("AccountDaoImpl 构造了");
    }
    @Override
    public void addAccount() {
        System.out.println("[Dao]: 新增账户的方法实现了....");
    }
}
| ##container## |
|---|
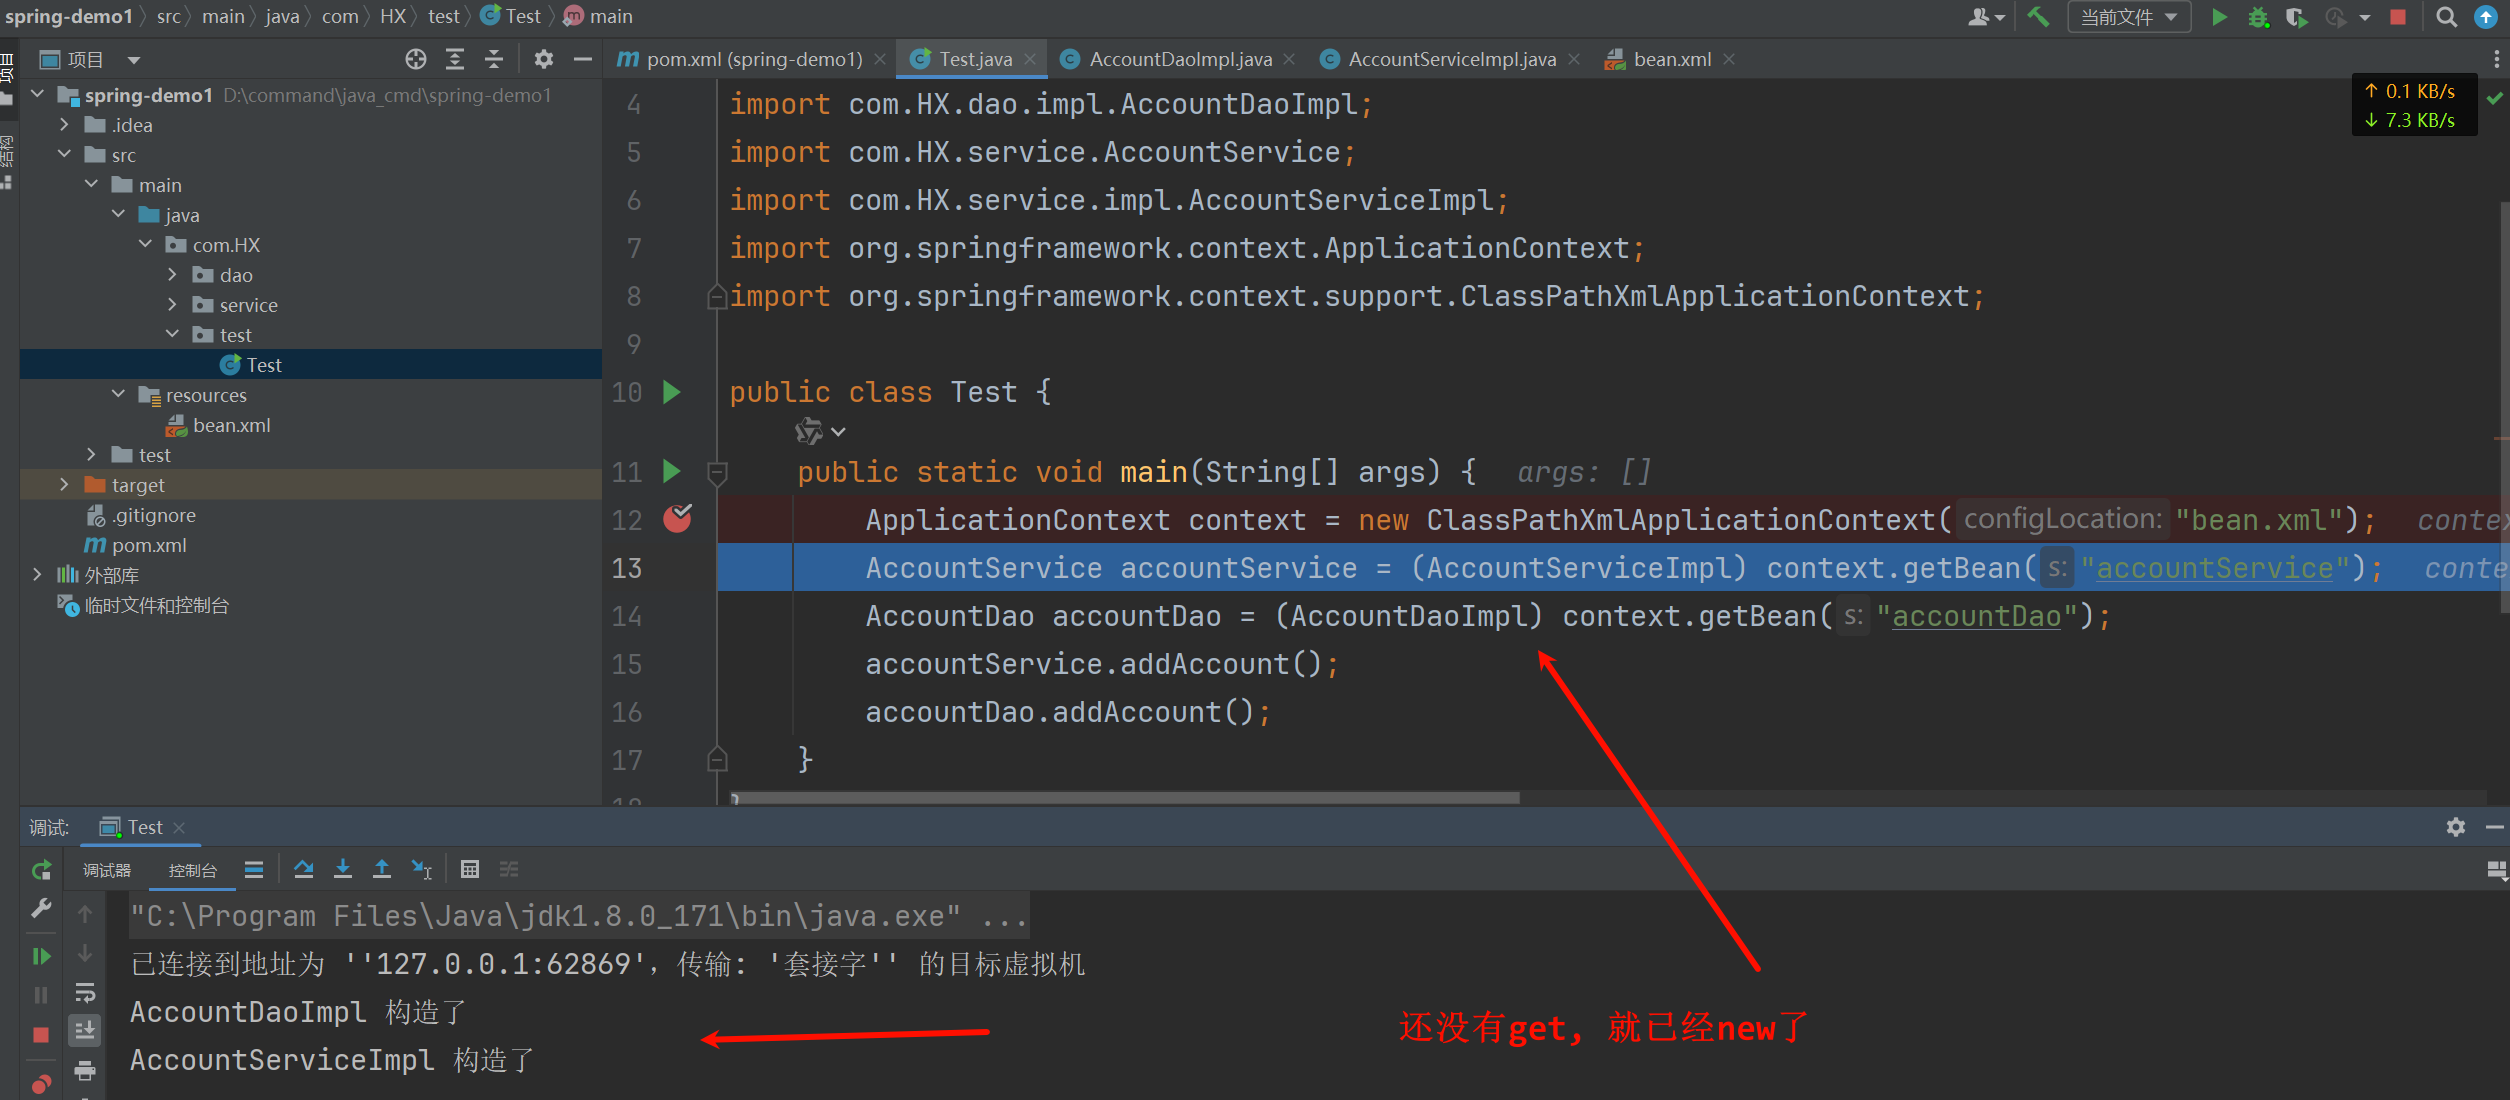 |
可以看到,当配置文件一旦加载完成,对象就已经创建。
- BeanFactory
BeanFactory它在构建核心容器时,创建对象采取的策略是采用延迟加载的方式,也就是说,什么时候根据id获取对象了,什么时候才真正的创建对象。
public class Test {
    public static void main(String[] args) {
//        ApplicationContext context = new ClassPathXmlApplicationContext("bean.xml");
        ClassPathResource classPathResource = new ClassPathResource("bean.xml");
        BeanFactory context = new XmlBeanFactory(classPathResource);
        AccountService accountService = (AccountServiceImpl) context.getBean("accountService");
        AccountDao accountDao = (AccountDaoImpl) context.getBean("accountDao");
        accountService.addAccount();
        accountDao.addAccount();
    }
}
| ##container## |
|---|
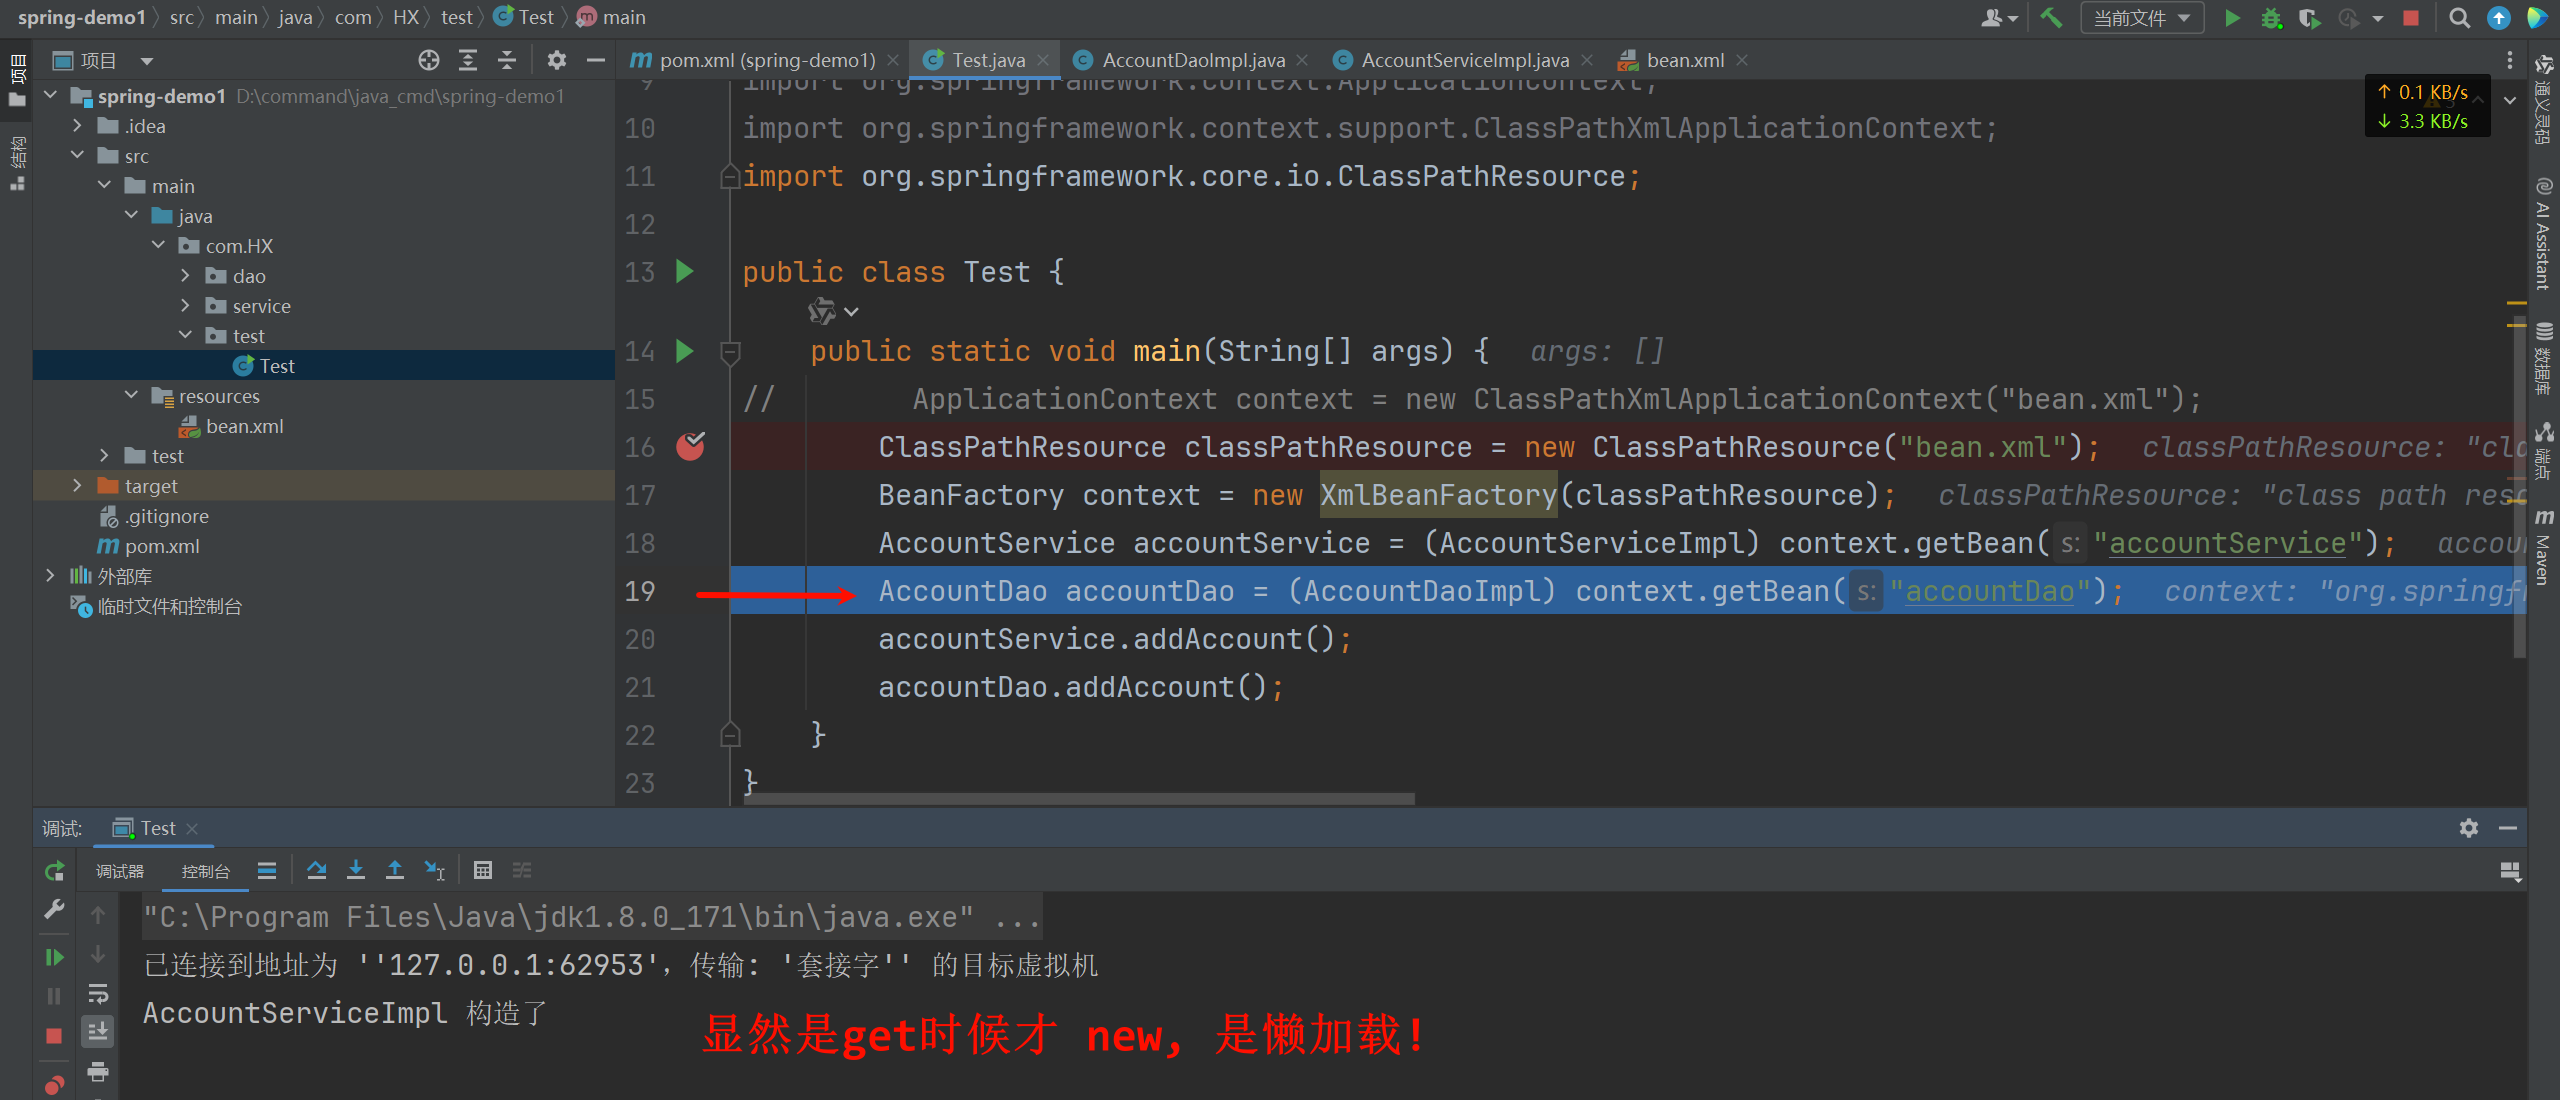 |
可以看到只有根据id创建对象时,才是真正的创建对象。
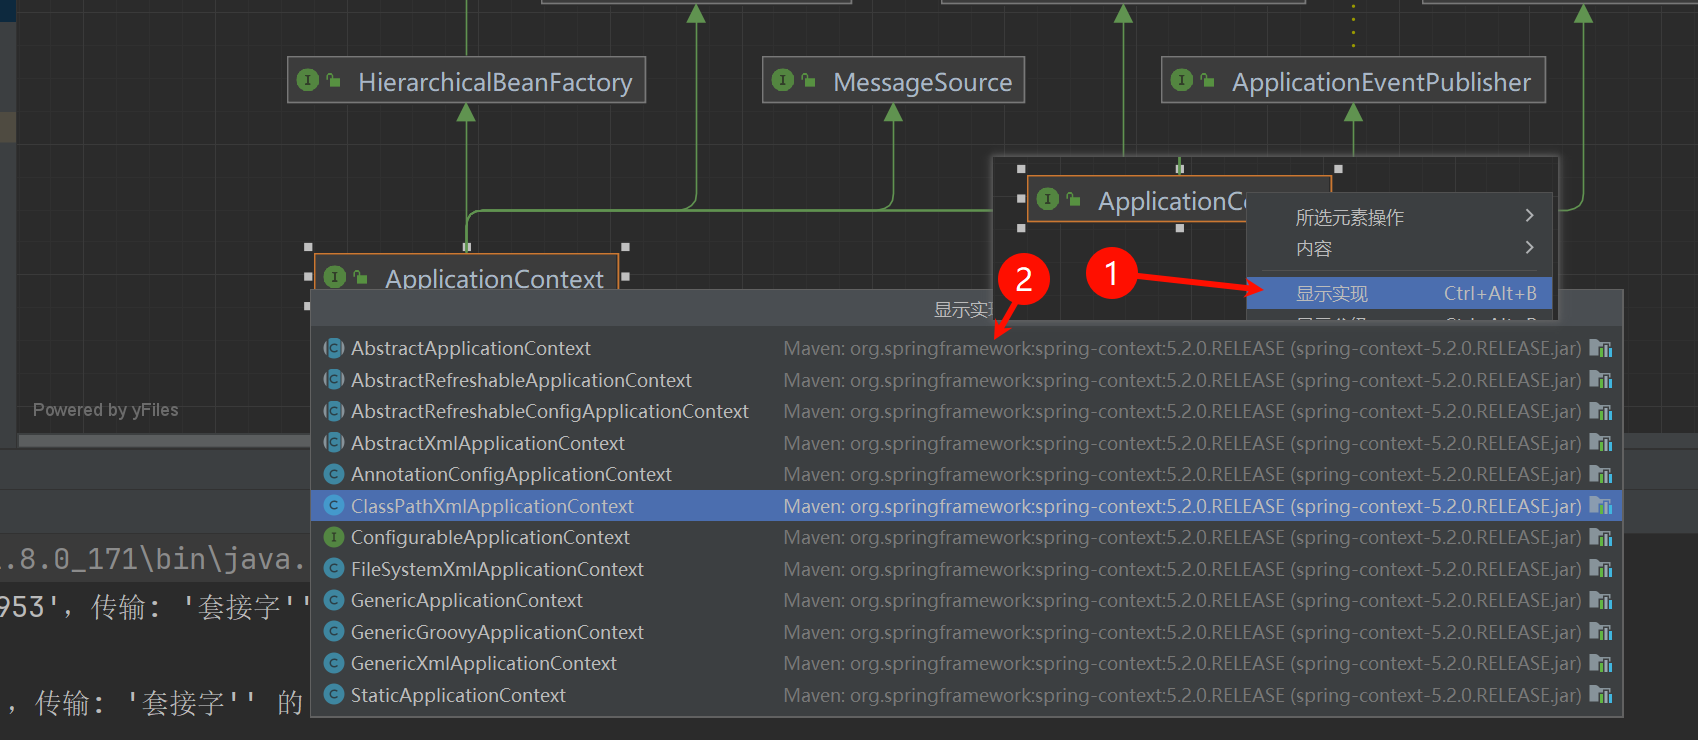
最后我们再来看一个问题:
ApplicationContext是一个接口,那么它的实现类呢?
| ##container## |
|---|
 |
-
ClassPathXmlApplicationContext它可以加载类路径下的配置文件,要求配置文件必须在类路径下,否则加载不了(这种比较常用)。之前演示的就是
ClassPathXmlApplicationContext,这里不再重复演示了。 -
FileSystemXmlApplicationContext(很少用)它可以加载磁盘任意路径下的配置文件(必须有访问权限)。
-
AnnotationConfigApplicationContext它是用于读取注解创建容器的,后面再介绍。